Expert Guide To Adjusting Toilet Flush Valves
Are you having trouble with a toilet that won’t flush right or keeps running? You’re not alone. Many homeowners experience these common yet frustrating issues. But fear not, Full Speed Plumbing is here with expert insights!
In this guide, we’ll show you how to tackle toilet flush valve adjustments, a key maintenance task that can save you water and prevent future headaches. Stick with us as we dive into the nuts and bolts of keeping your toilet in tip-top shape.
What is a Toilet Flush Valve?
A toilet flush valve is the heart of the flushing mechanism inside your toilet tank. This product plays a crucial role in beginning and ending the flushing process. When you push the flush lever, the valve opens, allowing water to rush from the tank into the toilet bowl, facilitating the swift removal of waste. After flushing, the valve closes, permitting the tank to refill for the next use.
Not only is it essential for effective toilet operation, but a well-adjusted valve also contributes to water conservation and reduces the likelihood of continuous water running in your bathroom, which can be both annoying and costly.
Recognizing a Faulty Flush Valve
If your toilet isn’t performing as expected, it could very well be due to a faulty flush valve. Here are some telltale signs to watch out for:
- Erratic or Weak Flushing: If your toilet flush is consistently weak, the flush valve may not be releasing water properly.
- Constant Running Water: A toilet that continues to run long after flushing usually points to a flush valve that isn’t sealing correctly.
- Water Trickling into the Bowl: Noticeable trickling water into the toilet bowl between flushes is a classic symptom of a flush valve that may need adjustment or replacement.
- Difficulty in Flushing: When the flush lever is hard to operate or doesn’t initiate a flush, the linkage to the flush valve might be obstructed or misaligned.
By keeping an eye out for these issues, you can act promptly to correct your flush valve, ensuring your toilet operates efficiently and saves water.
Adjusting the Flush Valve: Step-by-Step Guide
Adjusting your toilet’s flush valve is straightforward and doesn’t require a plumber. Just follow these simple steps:
1. Shut Off the Water Supply
Start by turning off the water supply to your toilet to prevent any spillage during your adjustment. The valve’s location can vary, but it’s typically located behind the toilet near the floor.
2. Remove the Toilet Tank Lid
Carefully lift the lid off of your toilet tank and set it aside in a safe place to avoid any damage. It’s usually heavy, so it’s best to use both hands.
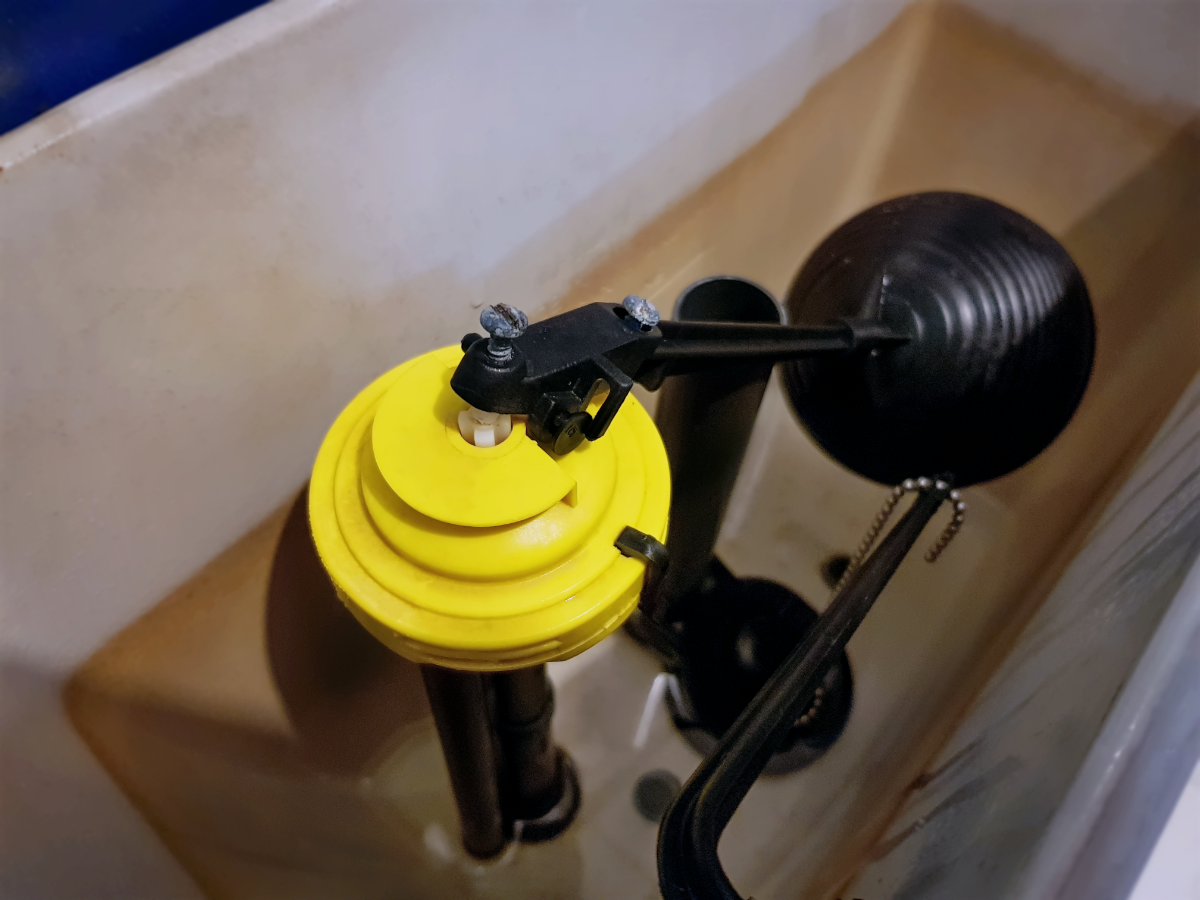
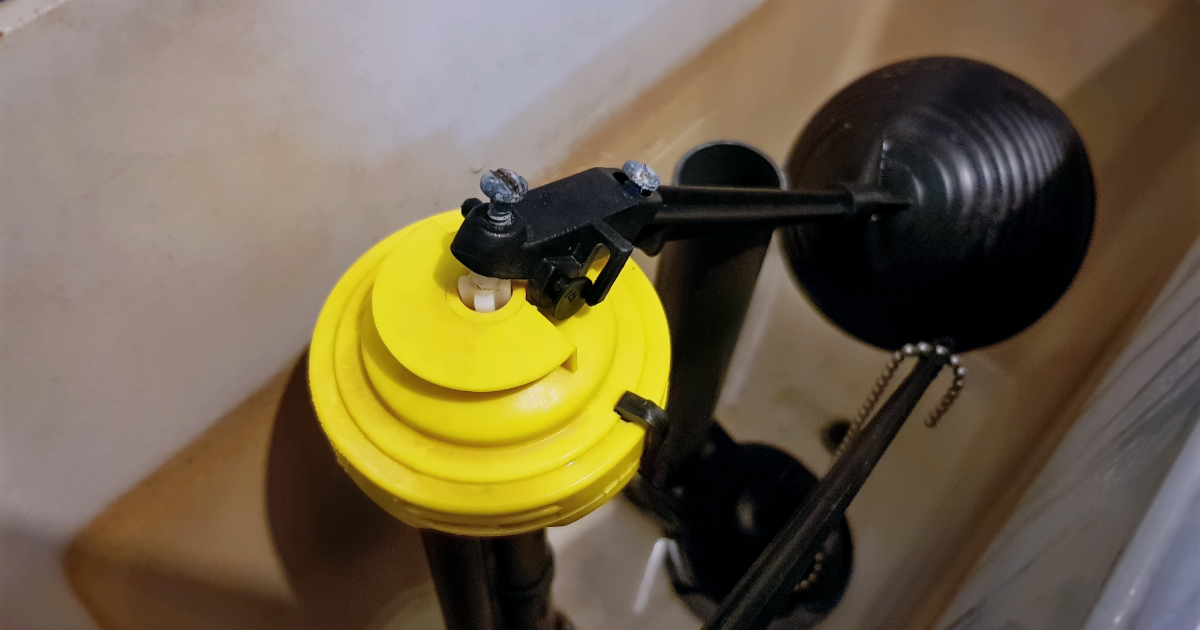
3. Inspect the Flush Valve and Connecting Parts
Examine the flush valve located at the bottom of the tank. Make sure to check for any signs of wear or damage to the valve itself and the connecting parts, including the chain and the seal.
4. Adjust the Flush Valve
If the chain is too slack, shorten it to ensure that it lifts the valve enough to release water. If the seal is worn out, consider replacing it to prevent leaks.
By completing these steps, your toilet should operate more efficiently. Remember to turn the water supply back on and give the toilet a few test flushes to ensure everything works correctly.
Water-Saving Tips Related to Toilet Flush Valve Adjustment
Conserving water is beneficial for the environment and can lead to significant savings on your water bill.
By implementing these simple water-saving tips related to toilet flush valve adjustments, you can boost the efficiency and overall performance of your toilet:
- Check for Leaks Regularly: A small leak can waste a lot of water over time. Conduct periodic checks to ensure your flush valve is not leaking.
- Upgrade to a Dual-Flush Valve: Consider installing a dual-flush valve, which gives you a choice between a forceful flush for solid waste and a weaker flush for liquid waste, saving a substantial amount of water.
- Adjust the Float: Lowering the float in your toilet tank will reduce water usage per flush. Be careful not to set it too low, or it might affect the flushing power.
- Replace Worn-Out Parts: If parts of the flush valve are worn, you should shop around for a replacement part. A good seal is crucial to prevent water from trickling constantly into the bowl.
- Don’t Use the Toilet as a Wastebasket: Each unnecessary flush can waste gallons of water, so avoid flushing down anything that could just as easily be thrown in a trash can. Additionally, using your toilet as a garbage disposal unit can also lead to toilet clogs, which can cause further issues down the line.
By following these steps, you can ensure that your toilet is not only running smoothly but is also conserving water effectively.
Scenarios Suitable for DIY Toilet Flush Valve Repair
If you’re a homeowner, DIY repair can be a satisfying and cost-effective solution for some common toilet flush valve problems. Here are several scenarios where you might consider a DIY approach before calling in the pros:
- Flapper Replacement: If the flapper inside the tank deteriorates or warps over time, replacing it is a relatively simple task that requires minimal tools.
- Chain Adjustment: Sometimes the chain attached to the flapper is too long or too short, affecting the flush. An adjustment may be all that’s needed.
- Gasket Seals: Over time, the gasket that seals the connection between the tank and the bowl can wear out. Replacing the gasket can resolve leaks or unusual sounds during flushing.
- Handle Issues: If the flush handle is loose or fails to activate the flush, tightening the set nut or replacing the handle are straightforward DIY fixes.
Signs It’s Time to Call a Professional Plumbing Service
Recognizing when a problem is beyond a simple DIY fix is key to preventing further damage. Here’s when you should consider calling a residential plumbing service to visit your home:
- Recurring Problems: If an issue keeps returning despite your best DIY efforts, it likely indicates a deeper problem that a professional should solve.
- Constant Running or Overflowing: When your toilet is overflowing or running non-stop, and adjustments aren’t helping, a plumber should assess the underlying cause.
- Low Water Pressure: If adjustments to the flush valve don’t address weak flushing and you notice low water pressure elsewhere, this could signify a more complex issue.
- Visible Damage to Pipes or Porcelain: Cracks or damage to the toilet bowl, tank, or pipes can lead to significant water damage and warrant professional intervention.
- Inaccurate Water Level: If the water level in the tank is too low or high, even after float adjustments, a plumber can diagnose and fix the root of the problem.
By evaluating these scenarios and signs, you can decide whether a flush valve issue is a DIY project or if it’s time to call in a professional.
Conclusion
Whether you’re a DIY enthusiast poised to tackle common toilet flush valve issues or you’ve encountered more complex challenges requiring a professional touch, Full Speed Plumbing in Mount Vernon, WA, is here to assist. Whether you need a simple repair or have to replace a plumbing fixture in your living space, you can rely on our team.
Our seasoned experts are committed to providing high-quality customer service while helping you conserve water and save money. Don’t let plumbing problems disrupt your life. Call us or visit our website to schedule an appointment and give your toilet the expert care it deserves.